Centmin Mod Addons
Discuss Centmin Mod Addons on the forums here.
Page last revision: Saturday July 18th, 2015 (previous update Sunday July 28th, 2013)
Centmin Mod v1.2.3 beta and higher versions have plans for official Centmin Mod Addons. These addons are located within your Centmin Mod install directory at addons/* and will provide standalone bash shell scripts to install additional features and possibly be open for 3rd party contribution as well. The only condition is that addons must be 100% compatible with Centmin Mod structure.
- Linux Malware Dectect (maldet) (new in 1.2.3-eva2000.08+ and higher)
- Custom Curl 7.43 RPM install (new in 1.2.3-eva2000.08+ and higher)
- IonCube PHP extension (new in 1.2.3-eva2000.08+ and higher)
- mysqladmin_shell.sh (new in 1.2.3-eva2000.08+ and higher)
- passenger.sh - Phusion Passenger Nginx module (new in 1.2.3-eva2000.08+ and higher)
- python27_install.sh - Python 2.7 alternate install (new in 1.2.3-eva2000.08+ and higher)
- mysqlmymonlite stats & info script
- linfo System Stats Information
- AVG Anti-Virus Free edition for Linux
- Wordpress WP-CLI tool addon
Linux Malware Dectect (maldet)
For discussions related to Linux Malware Detect addon, you can check out the Maldet addon discussion thread.
This addon installs both Linux Malware Detct (maldet) and ClamAV scanner which work in combination for the best speed in scanning and detecting malware and viruses on your CentOS Linux based server. Virus definitions are automatically updated via cronjob and automated scans occur on a daily basis for all public directories like web root and site domain Nginx vhost directories. Note, that cpu resource and memory usage requirements are higher with maldet + ClamAV installed. I would suggest at minimum needing at least 2 or 3 cpu cores and 1GB to 2GB of memory to run comfortably.
To install maldet, you need to run the addons/maldet.sh addon installer. Before you run maldet.sh, be sure to edit maldet.sh and fill in the ALERTEMAIL='[email protected]' variable field which is your email address you want maldet detected malware/virus alerts to be sent to. You can also fill in optional variable ALERT_POEMAIL='[email protected]' with your registered pushover.net notification email if you use pushover.net. Pushover.net allows notifications to be sent to mobile and tablet devices which have the Pushover mobile app installed.
# enter email address you want alerts sent to
# i.e. [email protected]
ALERTEMAIL=''

# enter your pushover.net email you want alerts sent to
# i.e. [email protected]
ALERT_POEMAIL=''
If ALERTEMAIL variable is empty in maldet.sh, you'll get a message prompt below:
./maldet.sh
CentOS / RHEL system detected

ALERTEMAIL variable detected as empty
edit ./maldet.sh and set an email address for ALERTEMAIL
Then re-run the script ./maldet.sh
To install and run maldet.sh after filling in your email alert variables, type in SSH as root user:
cd /usr/local/src/centminmod/addons
./maldet.sh
Once installed, you get daily cronjob automated maldet scans and if viruses or malware are detected get automatic email alerts. By default maldet is configured to automatically quarantine detected malware and viruses.
Example of a manual maldet scan of public web root of domain.com:
maldet -a /home/nginx/domains/domain.com/public
Linux Malware Detect v1.4.2
            (C) 2002-2013, R-fx Networks
            (C) 2013, Ryan MacDonald
inotifywait (C) 2007, Rohan McGovern
This program may be freely redistributed under the terms of the GNU GPL v2

maldet(11035): {scan} signatures loaded: 11760 (9871 MD5 / 1889 HEX)
maldet(11035): {scan} building file list for /home/nginx/domains/domain.com/public, this might take awhile...
maldet(11035): {scan} file list completed, found 200474 files...
maldet(11035): {scan} found ClamAV clamscan binary, using as scanner engine...
maldet(11035): {scan} scan of /home/nginx/domains/domain.com/public (200474 files) in progress...

maldet(11035): {scan} scan completed on /home/nginx/domains/domain.com/public: files 200474, malware hits 0, cleaned hits 0
maldet(11035): {scan} scan report saved, to view run: maldet --report 071914-1614.11035
Example of a manual maldet scan of ALL public web root of all domains using wildcard match ?:
/usr/local/maldetect/maldet -r /home/nginx/domains/?/public
Linux Malware Detect v1.4.2
            (C) 2002-2013, R-fx Networks
            (C) 2013, Ryan MacDonald
inotifywait (C) 2007, Rohan McGovern
This program may be freely redistributed under the terms of the GNU GPL v2

maldet(16277): {scan} signatures loaded: 11788 (9895 MD5 / 1893 HEX)
maldet(16277): {scan} building file list for /home/nginx/domains/*/public of new/modified files from last 7 days, this might take awhile...
maldet(16277): {scan} file list completed, found 112 files...
maldet(16277): {scan} found ClamAV clamscan binary, using as scanner engine...
maldet(16277): {scan} scan of /home/nginx/domains/*/public (112 files) in progress...

maldet(16277): {scan} scan completed on /home/nginx/domains/*/public: files 112, malware hits 0, cleaned hits 0
maldet(16277): {scan} scan report saved, to view run: maldet --report 092614-0045.16277
To view the scan's summary report:
maldet --report 092614-0045.16277
malware detect scan report for myhostname:
SCAN ID: 092614-0045.16277
TIME: Sep 26 00:45:48 +0000
PATH: /home/nginx/domains/*/public
RANGE: 7 days
TOTAL FILES: 112
TOTAL HITS: 0
TOTAL CLEANED: 0

===============================================
Linux Malware Detect v1.4.2 < [email protected] >
Malware & Virus Scan FTP Uploaded Files
With maldet and ClamAV scanner installed you can also setup Pure-FTPD automated virus and malware scanner for FTP uploaded files for Centmin Mod 1.2.3-eva2000.08+ and higher versions. Full details outlined here.
Custom Curl 7.43 RPM install
For discussions related to customcurl.sh addon, you can check out the customcurl.sh addon discussion thread.
Centos 6 defaults to curl 7.19 and Centos 7 defaults to curl 7.29 while latest curl version is 7.43 (at time of writing). This custom curl rpm addon routine allows optional update to curl 7.43 via centmin.sh CUSTOM_CURLRPM=y variable set prior to initial Centmin Mod installation or via standalone addons/customcurl.sh addon script for after Centmin Mod install setup. I've included a prepackaged set of those rpms in downloads/curlrpms.zip file to ensure that you have a local copy for initial installs.
List of the prepackaged set of custom curl 7.43 rpms:
ls -lah /svr-setup | egrep 'curl|ares|ssh2'
-rw-r--r--  1 root  root    81K Jun 21 20:46 c-ares-1.10.0-5.0.cf.rhel6.i686.rpm
-rw-r--r--  1 root  root    80K Jun 21 20:46 c-ares-1.10.0-5.0.cf.rhel6.x86_64.rpm
-rw-r--r--  1 root  root   369K Jun 17 21:06 curl-7.43.0-1.0.cf.rhel6.i686.rpm
-rw-r--r--  1 root  root   368K Jun 17 21:06 curl-7.43.0-1.0.cf.rhel6.x86_64.rpm
-rw-r--r--  1 root  root   370K Jun 17 21:06 curl-7.43.0-1.0.cf.rhel7.x86_64.rpm
-rw-r--r--  1 root  root   332K Jun 17 21:07 libcurl-7.43.0-1.0.cf.rhel6.i686.rpm
-rw-r--r--  1 root  root   321K Jun 17 21:07 libcurl-7.43.0-1.0.cf.rhel6.x86_64.rpm
-rw-r--r--  1 root  root   336K Jun 17 21:07 libcurl-7.43.0-1.0.cf.rhel7.x86_64.rpm
-rw-r--r--  1 root  root   681K Jun 17 21:07 libcurl-devel-7.43.0-1.0.cf.rhel6.i686.rpm
-rw-r--r--  1 root  root   681K Jun 17 21:07 libcurl-devel-7.43.0-1.0.cf.rhel6.x86_64.rpm
-rw-r--r--  1 root  root   678K Jun 17 21:07 libcurl-devel-7.43.0-1.0.cf.rhel7.x86_64.rpm
-rw-r--r--  1 root  root   148K Jan 30  2014 libcurl7112-7.11.2-25.cf.rhel6.i686.rpm
-rw-r--r--  1 root  root   145K Jan 30  2014 libcurl7112-7.11.2-25.cf.rhel6.x86_64.rpm
-rw-r--r--  1 root  root   176K Jan 30  2014 libcurl7155-7.15.5-17.cf.rhel6.i686.rpm
-rw-r--r--  1 root  root   173K Jan 30  2014 libcurl7155-7.15.5-17.cf.rhel6.x86_64.rpm
-rw-r--r--  1 root  root   151K Jun 18 18:43 libssh2-1.6.0-2.0.cf.rhel6.i686.rpm
-rw-r--r--  1 root  root   150K Jun 18 18:43 libssh2-1.6.0-2.0.cf.rhel6.x86_64.rpm
-rw-r--r--  1 root  root   153K Jun 18 18:43 libssh2-1.6.0-2.0.cf.rhel7.x86_64.rpm
-rw-r--r--  1 root  root    68K Jun 18 18:43 libssh2-devel-1.6.0-2.0.cf.rhel6.i686.rpm
-rw-r--r--  1 root  root    68K Jun 18 18:43 libssh2-devel-1.6.0-2.0.cf.rhel6.x86_64.rpm
-rw-r--r--  1 root  root    67K Jun 18 18:43 libssh2-devel-1.6.0-2.0.cf.rhel7.x86_64.rpm
To install custom curl 7.43 rpms run the customcurl.sh addon install via SSH and then afterwards recompile php-fpm via centmin.sh menu option 5 to ensure PHP also has curl 7.43
cd /usr/local/src/centminmod/addons/
./customcurl.sh
Installed RPMs on CentOS 7.1 Linux
rpm -qa curl libcurl libcurl-devel libssh2 libssh2-devel libcurl7155 libcurl7112 c-ares
libssh2-1.6.0-2.0.cf.rhel7.x86_64
curl-7.43.0-1.0.cf.rhel7.x86_64
libssh2-devel-1.6.0-2.0.cf.rhel7.x86_64
c-ares-1.10.0-3.el7.x86_64
libcurl-devel-7.43.0-1.0.cf.rhel7.x86_64
libcurl7155-7.15.5-17.cf.rhel6.x86_64
libcurl-7.43.0-1.0.cf.rhel7.x86_64
libcurl7112-7.11.2-25.cf.rhel6.x86_64
Check backwards compatibility/dependencies rpms have the right files in place on system.
rpm -ql libcurl7155 libcurl7112
/usr/lib64/libcurl.so.3
/usr/lib64/libcurl.so.3.0.0
/usr/share/doc/libcurl7155-7.15.5
/usr/share/doc/libcurl7155-7.15.5/BUGS
/usr/share/doc/libcurl7155-7.15.5/CHANGES
/usr/share/doc/libcurl7155-7.15.5/COPYING
/usr/share/doc/libcurl7155-7.15.5/FAQ
/usr/share/doc/libcurl7155-7.15.5/FEATURES
/usr/share/doc/libcurl7155-7.15.5/MANUAL
/usr/share/doc/libcurl7155-7.15.5/README
/usr/share/doc/libcurl7155-7.15.5/RESOURCES
/usr/share/doc/libcurl7155-7.15.5/TODO
/usr/share/doc/libcurl7155-7.15.5/TheArtOfHttpScripting
/usr/lib64/libcurl.so.2
/usr/lib64/libcurl.so.2.0.2
/usr/share/doc/libcurl7112-7.11.2
/usr/share/doc/libcurl7112-7.11.2/BUGS
/usr/share/doc/libcurl7112-7.11.2/CHANGES
/usr/share/doc/libcurl7112-7.11.2/COPYING
/usr/share/doc/libcurl7112-7.11.2/FAQ
/usr/share/doc/libcurl7112-7.11.2/FEATURES
/usr/share/doc/libcurl7112-7.11.2/MANUAL
/usr/share/doc/libcurl7112-7.11.2/README
/usr/share/doc/libcurl7112-7.11.2/RESOURCES
/usr/share/doc/libcurl7112-7.11.2/TODO
/usr/share/doc/libcurl7112-7.11.2/TheArtOfHttpScripting
Check curl version = 7.43 with libcurl 7.43 and libssh2 1.6.0
curl --version
curl 7.43.0 (x86_64-redhat-linux-gnu) libcurl/7.43.0 NSS/3.18 Basic ECC zlib/1.2.7 libidn/1.28 libssh2/1.6.0
Protocols: dict file ftp ftps gopher http https imap imaps ldap ldaps pop3 pop3s rtsp scp sftp smb smbs smtp smtps telnet tftp
Features: AsynchDNS IDN IPv6 Largefile GSS-API Kerberos SPNEGO NTLM NTLM_WB SSL libz UnixSockets Metalink
Check PHP curl version after recompile php-fpm via centmin.sh menu option 5 to ensure PHP also has curl 7.43
php --ri curl

curl

cURL support => enabled
cURL Information => 7.43.0
Age => 3
Features
AsynchDNS => Yes
Debug => No
GSS-Negotiate => No
IDN => Yes
IPv6 => Yes
Largefile => Yes
NTLM => Yes
SPNEGO => Yes
SSL => Yes
SSPI => No
krb4 => No
libz => Yes
CharConv => No
Protocols => dict, file, ftp, ftps, gopher, http, https, imap, imaps, ldap, ldaps, pop3, pop3s, rtsp, scp, sftp, smb, smbs, smtp, smtps, telnet, tftp
Host => x86_64-redhat-linux-gnu
SSL Version => NSS/3.18 Basic ECC
ZLib Version => 1.2.7
libSSH Version => libssh2/1.6.0
If you need to check the addons/customcurl.sh log it's saved at /root/centminlogs in timestamped file i.e. centminmod_customcurl_rpms_290615-033958.log
ls -lAhrt /root/centminlogs
total 12M
-rw-r--r--. 1 root root 9.8K Jun 22 18:32 centminmod_1.2.3-eva2000.08_230615-043144_yuminstall_centos7.log
-rw-r--r--. 1 root root  49K Jun 22 18:35 centminmod_yumtimes_230615-043144.log
-rw-r--r--. 1 root root   38 Jun 22 18:35 centminmod_profiletimes_230615-043144.log
-rw-r--r--. 1 root root 231K Jun 22 18:35 centminmod_downloadtimes_230615-043144.log
-rw-r--r--. 1 root root 1.3K Jun 22 18:36 securedtmp.log
-rw-r--r--. 1 root root   44 Jun 22 18:37 centminmod_libresslinstalltime_230615-043144.log
-rw-r--r--. 1 root root  842 Jun 22 18:38 gcc_native.log
-rw-r--r--. 1 root root 911K Jun 22 18:40 centminmod_ngxinstalltime_230615-043144.log
-rw-r--r--. 1 root root   58 Jun 22 18:46 centminmod_phpinstalltime_230615-043144.log
-rw-r--r--. 1 root root 1.8K Jun 22 18:51 centminmod_1.2.3-eva2000.08_230615-043144_yum-log.log
-rw-r--r--. 1 root root   20 Jun 22 18:51 install.utc.time.log
-rw-r--r--. 1 root root 2.6M Jun 22 18:51 centminmod_1.2.3-eva2000.08_230615-043144_install.log
-rw-r--r--. 1 root root   49 Jun 22 18:51 firstyum_installtime_230615-042856.log
-rw-r--r--  1 root root 1.5K Jun 23 16:20 centminmod_1.2.3-eva2000.08_230615-161938_git_envsetup.log
-rw-r--r--  1 root root  260 Jun 23 16:21 centminmod_1.2.3-eva2000.08_230615-162056_git_updatecur_branch.log
-rw-r--r--  1 root root  508 Jun 23 16:43 centminmod_1.2.3-eva2000.08_230615-164329_git_updatecur_branch.log
-rw-r--r--  1 root root  506 Jun 23 16:49 centminmod_1.2.3-eva2000.08_230615-164925_git_updatecur_branch.log
-rw-r--r--  1 root root 5.5K Jun 24 22:18 centminmod_1.2.3-eva2000.08_240615-221559_php_upgrade.log
-rw-r--r--  1 root root 4.7M Jun 24 22:42 centminmod_1.2.3-eva2000.08_240615-223121_php_upgrade.log
-rw-r--r--  1 root root 2.2M Jun 24 23:08 centminmod_1.2.3-eva2000.08_240615-225123_php_upgrade.log
-rw-r--r--  1 root root 481K Jun 25 00:18 centminmod_1.2.3-eva2000.08_250615-001642_memcached_reinstall.log
-rw-r--r--  1 root root 9.6K Jun 29 03:40 centminmod_customcurl_rpms_290615-033958.log
IonCube PHP extension
For discussions related to ioncube.sh addon, you can check out the ioncube.sh addon discussion thread.
To install ionCube Loader PHP extension run the ioncube.sh addon install via SSH.
cd /usr/local/src/centminmod/addons/
./ioncube.sh
You can check if ionCube is loaded into PHP via these 2 commands
php --ri ioncube
php -m
mysqladmin_shell.sh
For discussions related to mysqladmin_shell.sh addon, you can check out the mysqladmin_shell.sh addon discussion thread.
The mysqladmin_shell.sh addon is a shell based script to do some simple tasks just for creating new MySQL users/passwords, creating new MySQL databases and assigning MySQL permissions, changing MySQL user passwords and deleting MySQL users.
Example usage of mysqladmin_shell.sh addon install via SSH.
cd /usr/local/src/centminmod/addons/
./mysqladmin_shell.sh {multidb|setuserdb|setpass|deluser|showgrants}
Create MySQL user/pass and MySQL database and grant privileges to database.
cd /usr/local/src/centminmod/addons/
./mysqladmin_shell.sh setuserdb
Change existing MySQL user's password.
cd /usr/local/src/centminmod/addons/
./mysqladmin_shell.sh setpass
Delete MySQL user.
cd /usr/local/src/centminmod/addons/
./mysqladmin_shell.sh deluser
Show existing MySQL user's privileges via Show Grants.
cd /usr/local/src/centminmod/addons/
./mysqladmin_shell.sh showgrants
Create multiple MySQL databases and username/passwords from a specified text file
For example, contents of /home/dblist.txt - one entry per line in format order of
dbname dbusername dbpassword
db2name db2username db2password
Run new multidb command option and enter path of dblist.txt file i.e. /home/dblist.txt
cd /usr/local/src/centminmod/addons/
./mysqladmin_shell.sh multidb
--------------------------------------------------------------
Basic MySQL Admin - create mysql user & databases
--------------------------------------------------------------
--------------------------------------------------------------

----------------------------------------------------------------------------
Create Multiple MySQL Databases, User & Pass From specified filepath/name
i.e. /home/nginx/domains/domain.com/dbfile.txt
One entry per line in dbfile.txt in format of:
databasename databaseuser databasepass
----------------------------------------------------------------------------

Enter full path to db list file i.e. /home/nginx/domains/domain.com/dbfile.txt (to exit type = x): /home/dblist.txt

Grants for dbusername@localhost
GRANT USAGE ON *.* TO 'dbusername'@'localhost' IDENTIFIED BY PASSWORD '*6207EE3F049D8F87CC0B4BBB8814917B31FB8E4F'
GRANT SELECT, INSERT, UPDATE, DELETE, CREATE, DROP, ALTER, CREATE TEMPORARY TABLES, LOCK TABLES, EXECUTE ON `dbname`.* TO 'dbusername'@'localhost'

Ok: MySQL user:  MySQL database: dbname created successfully

Grants for db2username@localhost
GRANT USAGE ON *.* TO 'db2username'@'localhost' IDENTIFIED BY PASSWORD '*59F34589CBECBF3AB16AA51EA7E7C1D8DF068A76'
GRANT SELECT, INSERT, UPDATE, DELETE, CREATE, DROP, ALTER, CREATE TEMPORARY TABLES, LOCK TABLES, EXECUTE ON `db2name`.* TO 'db2username'@'localhost'

Ok: MySQL user:  MySQL database: db2name created successfully
passenger.sh - Phusion Passenger Nginx module
This addon allows implemenatation for Phusion Passenger Nginx Module for Nginx which allows deployment of both Python, NodeJS, Meteor and Ruby based applications with Nginx as frontend.
For install instructions and discussions related to passenger.sh addon, you can check out the passenger.sh addon discussion thread.
python27_install.sh - Python 2.7 alternate install
Addon installs python 2.7 besides CentOS 6.x system's python 2.6. Addon won't work for CentOS 7.x as that OS version already has python 2.7 by default. Centmin Mod 1.2.3-eva2000.09 beta01 = 123.09beta01 git branch also has additional addon for installing python 3.2, python 3.3 and python 3.4 besides both CentOS 6 and CentOS 7 system default python versions.
rpm -ql python27 python27-pip python27-virtualenv | grep bin
/usr/bin/pydoc27
/usr/bin/python2.7
/usr/bin/pip2.7
/usr/bin/virtualenv-2.7
python --version
Python 2.6.6

python2.7 --version
Python 2.7.10
mysqlmymonlite stats & info script
How to install mysqlmymonlite video guide. (best viewed in full screen HD mode)
My mysqlmymonlite script was written originally for vBulletin server optimisation requests from vB customers so they can quickly gather their entire server's vital configuration settings and usage statistics.
The script takes less than <12 seconds on a typical server to gather all server environment settings and statistics needed for a competent system administrator to understand that client's server environment. The script is compatible with Centmin Mod setup - just make sure to choose the basic centos directory version and not the centos_whm directory version (yes the script works with plain CentOS or Debian servers as well as WHM/Cpanel based CentOS servers).
The script was created with aim of providing as much statistic and info output as possible without revealing any private server sensitive information. So is suited to sharing output on forums where you are asking other folks for server optimisation or troubleshooting advice. You may want to enclose the output within [CODE][/CODE] tags on forums though.
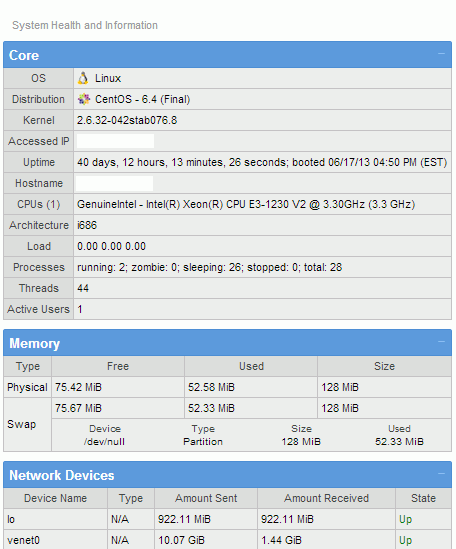
linfo System Stats Information
Centmin Mod Addon for linfo system information script linfo.sourceforge.net.
How to install ?
If you run centmin.sh from /usr/local/src/centminmod, then to install linfo follow these commands in SSH telnet:
cd /usr/local/src/centminmod/addons/
./linfo.sh install
Pay attention to the last few lines of output which display where to view linfo stats (hostname.domain.com/cinfo) and path to the files on the server (/usr/local/nginx/html/cinfo) as well as Username and Password to access the stats.
-------------------------------------------------------
Password protected hostname.domain.com/cinfo
at path /usr/local/nginx/html/cinfo
-------------------------------------------------------
Username: adminFUFt+OE=
Password: R4aQp5gnVGMGgQ==
-------------------------------------------------------
If you want to delete linfo type:
./linfo.sh delete
If you want to update linfo type the following and enter latest version number at linfo.sourceforge.net. A new Username and Password are generated on update so please take note of the last few lines containing the new login details.
./linfo.sh update
AVG Anti-Virus Free edition for Linux
AVG Anti-Virus Free edition for Linux provides basic anti-virus and malware detection for your Centmin Mod / CentOS based server. Full details here.avgscan /home/nginx/domains/domain.com/public AVG command line Anti-Virus scanner Copyright (c) 2013 AVG Technologies CZ Virus database version: 3204/6489 Virus database release date: Sat, 13 Jul 2013 18:05:00 -0500 Files scanned : 57654(57654) Infections found : 0(0) PUPs found : 0 Files healed : 0 Warnings reported : 0 Errors reported : 0
avgscan -h

AVG command line Anti-Virus scanner
Copyright (c) 2013 AVG Technologies CZ

Anti-Virus scanner usage:
avgscan [options] [path-list]
Options:
        -h, --help               Display this help.
        -v, --version            Display version.
        -d, --debug              Verbose mode. Multiple -d options increase the
                                 verbosity. The maximum is 3.
        -T, --tui                Use a terminal user interface.
        -x, --exclude=     Exclude path from scan. Multiple --exclude can
                                 be specified.
        -e, --ext=    Scan files with specified extension. Multiple
                                 --ext can be specified. Can't be used with
                                 --noext option.
        -n, --noext=  Exclude files with specified extension.
                                 Multiple --noext options can be specified.
                                 Can't be used with --ext option.
        -l, --heal               Automatically heal infected object.
        -t, --delete             Automatically delete infected object.
        -u, --vv-move            Automatically move infected object into vault.
        -U, --vv-backup          Backup infected object if healed by deletion.
            --ignerrors          Do not report object scan errors.
        -H, --heur               Use heuristics for scanning. By default on.
            --no-heur            Disable heuristics for scanning.
        -p, --pup                Scan for Potentially Unwanted Programs.
                                 By default on.
            --no-pup             Disable scanning for PUPs.
        -P, --pup2               Scan for enhanced set of Potentially Unwanted
                                 Programs.
        -c, --coo                Scan cookies.
        -i, --hidext             Recognize hidden extensions.
        -m, --macrow             Report documents with macros.
        -o, --repok              Report also clean files.
        -w, --pwdw               Report password protected files.
        -b, --arcbombsw          Report archive bombs. By default on.
            --no-arcbombsw       Do not report archive bombs.
        -M, --media              Do not scan through media files.
        -j, --paranoid           Enable paranoid mode. Scan for less dangerous
                                 malware and more time consuming algoritms.
        -r, --report=  Save scan report to specified file.
        -a, --arc                Scan through archives.
        -L, --arc-reclevel=N     Maximum recursion level while scanning archives.
                                 Default value is 40.
        -S, --arc-maxfilesize=N  Maximum file size extracted from archives.
                                 Default value is 268435456 B.
        -N, --arc-maxfilenum=N   Maximum number of files scanned in archives.
                                 Default value is 50000.
        -B, --boot-sector        Scan boot sector.
        -s, --specfs             Scan special filesystems.
        -R, --reclevel=N         Descend at most N (a non-negative integer)
                                 levels of directories. Default value is 16384.
        -W, --winsysdir          Specifies a comma separated list of windows
                                 system directories. Any infected files found
                                 in this directory are marked as whitelisted
                                 in order to protect these files from being
                                 removed/moved to vault.
        -F, --filelist= Scan file paths specified in given file, all
                                  other paths on command line will be ignored.
Wordpress WP-CLI tool addon
Update: Full working WP-CLI usage guide added here.
Centmin Mod v1.2.3 beta adds support for Wordpress WP-CLI tool which allows you to manage Wordpress installations from command line - including updating plugins, multisite wordpress installs and creating post etc. The addon can be found in zip download folder /addons/wpcli.sh.
You'll need to give wpcli.sh executable permissions before running the script.
Note: If you're using older Centmin Mod version prior to using latest Centmin Mod v1.2.3 beta (13/06/13 dated), you will need to first run centmin.sh menu option #5 to recompile PHP so you have readline and PCNTL PHP extension support first before running wpcli.sh.
  cd /usr/local/src/centmin-v1.2.3mod/addons/
  chmod +x wpcli.sh
  ./wpcli.sh install
Then log out of SSH telnet session, then log back in so below commands work properly. This only has to be done the initial time after install only.
WP-CLI requires installation of git on your CentOS server and the Centmin Mod Addon script installer will take care of all dependency requirements including the required PHP readline and PCNTL extension support.
WP-CLI version 0.14+ changes
WP-CLI version 0.14 was released with changes to prevent the tool from being run as root user. When you run WP-CLI command as root user you will get the below warning and suggestions on 2 ways to now run the tool. For now with Centmin Mod, you would need to use --allow-root flag. At least until future Centmin Mod versions support proper chrooted and jailed individual user accounts (see preview of this feature here).
Running command:
wp --info
will now result in warning below
Error: YIKES! It looks like you're running this as root. You probably meant to run this as the user that your WordPress install exists under.

If you REALLY mean to run this as root, we won't stop you, but just bear in mind that any code on this site will then have full control of your server, making it quite DANGEROUS.

If you'd like to continue as root, please run this again, adding this flag:  --allow-root

If you'd like to run it as the user that this site is under, you can run the following to become the respective user:

    sudo -u USER -i -- wp ...
To run command now with 0.14, you need to run as:
wp --info --allow-root
output:
PHP binary:     /usr/local/bin/php
PHP version:    5.5.8
php.ini used:   /usr/local/lib/php.ini
WP-CLI root dir:        phar://wp-cli.phar
WP-CLI global config:
WP-CLI project config:
WP-CLI version: 0.14.0
Info and help and other commands and output below:
Info command
wp --info
  PHP binary:     /usr/local/bin/php
  PHP version:    5.3.27
  php.ini used:   /usr/local/lib/php.ini
  wp-cli root:    /root/.wp-cli/vendor/wp-cli/wp-cli/php/
  wp-cli config:
  wp-cli version: 0.10.2
Display installed plugins
wp plugin status
Install hello-dolly
wp plugin install hello-dolly
Install and activate google-sitemap-generator
wp plugin install google-sitemap-generator --activate
Update akismet
wp plugin update akismet
Update all plugins
wp plugin update --all
Turn on/off google-sitemap-generator
wp plugin toggle [plugin]
Remove plugin from the system
wp plugin uninstall [plugin]
Delete plugin files
wp plugin delete [plugin]
Help command
wp core --help
usage: wp core config --dbname=--dbuser= [--dbpass= ] [--dbhost= ] [--dbprefix= ] [--extra-php] or: wp core download [--locale= ] [--version= ] [--path= ] [--force] or: wp core init-tests [ ] --dbname= --dbuser= [--dbpass= ] or: wp core install --url= --title= [--admin_name= ] --admin_email= --admin_password= or: wp core install-network --title= [--base= ] or: wp core is-installed or: wp core update [ ] [--version= ] [--force] or: wp core update-db or: wp core version [--extra]
Quick start guide.
1. Add and setup your site's Nginx Vhost configure file if you have not done so already via Centmin Mod centmin.sh menu option #2 - details outlined here.
2. Download latest Wordpress tarball file http://wordpress.org/latest.tar.gz and extract contents to directory you intend to install Wordpress to i.e. /home/nginx/domains/yourdomain.com/public/wp or use WP-CLI tool command below within intended Wordpress install directory:
wp core download
To upgrade:
wp core update
3. Create Wordpress MySQL database and create MySQL user if you haven't already done so. Full details outlined in step #2 at http://centmin.sh/nginx_configure_wordpress_ffpc_plugin.html#installwp
4. Use WP-CLI create the wp-config.php file i.e. database named wordpressdb351 and MySQL username = mysqlusername via command line in SSH telnet - running command within the Wordpress install directory /home/nginx/domains/yourdomain.com/public/wp.
WP-CLI even takes care of setting up wp-config.php Wordpress Security Keys for AUTH_KEY, SECURE_AUTH_KEY, LOGGED_IN_KEY and NONCE_KEY. A secret key makes your Wordpress site harder to hack and access harder to crack by adding random elements to the password.
  cd /home/nginx/domains/yourdomain.com/public/wp
  wp core config --dbname=wordpressdb351 --dbuser=mysqlusername
output:
  wp core config --dbname=wordpressdb351 --dbuser=mysqlusername
Success: Generated wp-config.php file.
5. Use WP-CLI to install Wordpress itself via command in SSH telnet within the Wordpress install directory:
  cd /home/nginx/domains/yourdomain.com/public/wp
  wp core install --url='http://yourdomain.com/wp' --title='your wordpress site title' --admin_email='[email protected]' --admin_password='yourwordpressadminpass' --admin_name=adminuser
Where:
- url - web url link to where your Wordpress site will be installed
- title - is title of your Wordpress site
- admin_email - is your Wordpress admin user's email address
- admin_password - is your Wordpress admin user's password
- admin_name - is your Wordpress admin username.
Then just open your web browser to http://yourdomain.com/wp and you'll have Wordpress install already setup. You'll then want to manually edit your yourdomain.com's Nginx vhost at /usr/local/nginx/conf/conf.d/yourdomain.com.conf for proper Wordpress rewrite rules as outlined here.
Other WP-CLI resources:
You can find full details and example usage from the below links: